
A spa-like bathroom comes down to two things working together: calm, natural-looking surfaces and soft, well-placed lighting. Get the tiles and the lighting right and even a compact family bathroom can feel like a hotel retreat at the end of a long day.
In this blog, we look at how to pair large-format, marble and stone-effect tiles with LED strip lighting, how to plan safe LED bathroom lighting around each bathroom zone, and the small details that make the difference between a bright, functional room and one that feels genuinely relaxed.
Start With the Tiles: Calm, Natural Surfaces
Every spa you have ever enjoyed has one thing in common: a restrained palette of natural-looking materials. Stone, marble, soft greys, warm beiges and the occasional deep brown or muted blue all help the mind slow down. Porcelain tiles now recreates these looks convincingly, without the maintenance headaches of real stone in a steamy bathroom.
Go large to reduce grout lines.
Big formats such as 120x60cm tiles and porcelain slabs give walls and floor areas a calm, continuous look, and fewer joints means less cleaning. We explain the options in our guide to large format tiles versus porcelain slabs, and you can browse our XL tiles and porcelain slab tiles ranges.
Choose marble or stone effects for that hotel feel.
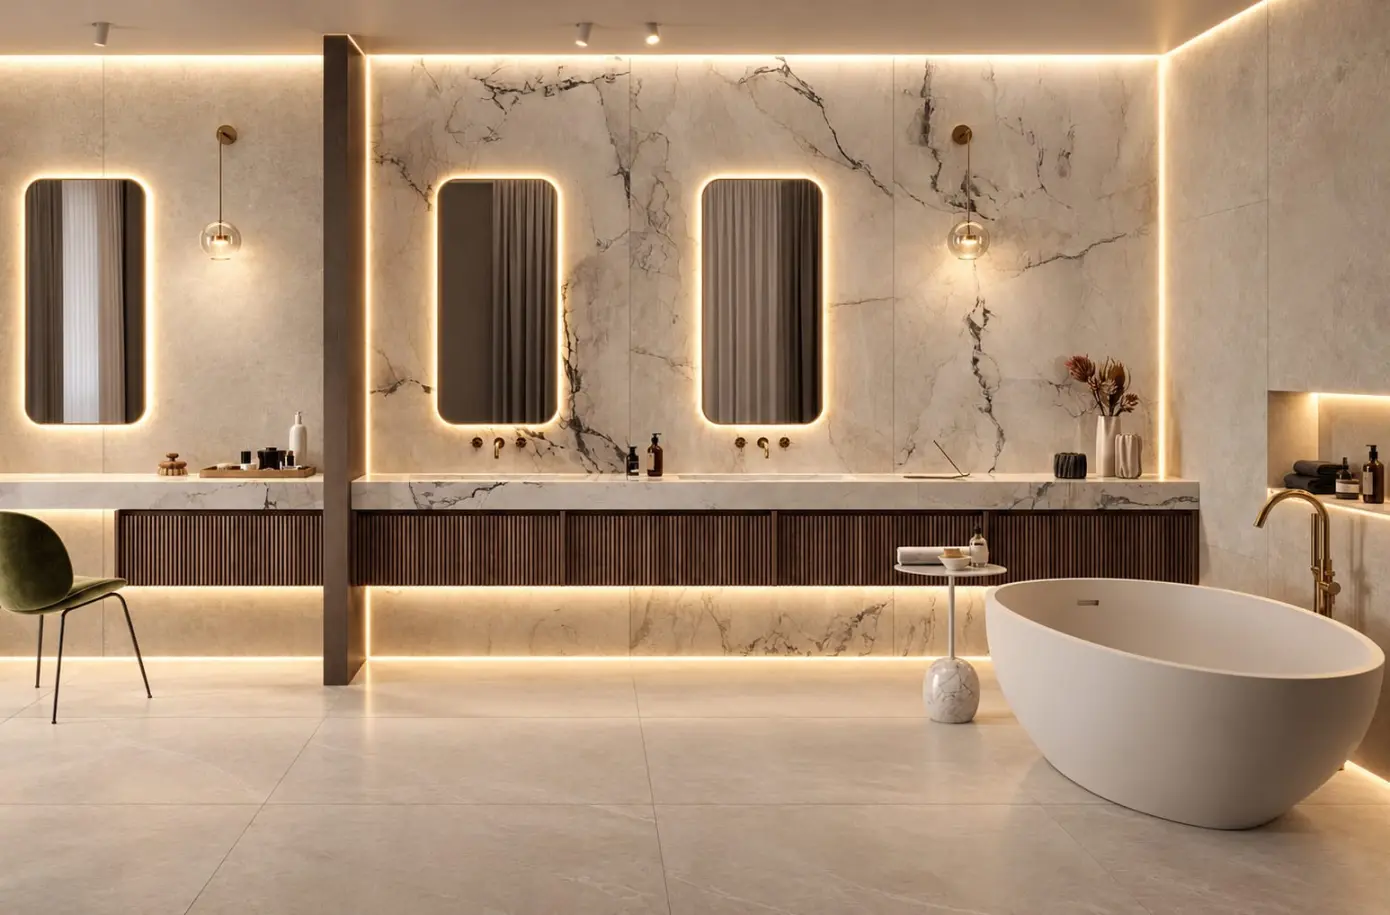
Marble effect tiles are especially good with LED lighting because the veining and polished surface catch and bounce light around the room. Our The Room collection offers a wide range of marbles, each with its own mood, while stone effect tiles suit a more earthy, natural style.
Use texture to create zones.
A contrasting feature wall behind the bath or basin, or a textured finish inside the shower, helps define each area. Mosaics such as Blue Savoy work beautifully in shower niches, and 3D tiles like Cubics come alive when grazed by a strip of light.
Ordering free cut samples lets you see how each tile reacts to your own lighting before you commit.
Layer Your Bathroom Lighting
A single bright downlight in the middle of the ceiling is the opposite of spa lighting. It flattens texture and throws harsh shadows across your face and furniture. The answer is multiple lights, layered to suit each kind of bathroom use.
- Ambient light. Bathroom ceiling lights still matter, but choose flush fittings or recessed downlights with a soft, diffused output so they fill the space gently. Put them on a dimmer so you can turn them right down for an evening bath.
- Functional lighting. Task light is all about the mirror. Light positioned either side of the face, or integrated into bathroom mirrors, helps reduce shadows when shaving or applying makeup, which an overhead light alone can’t do.
- Accent lighting. This is where LED strips earn their keep. Tucked into niches, under a floating vanity cabinet or along a ceiling recess, they create the soft glow that makes a room feel relaxed.
Use separate switches or a scene controller so each layer can be used on its own. Bright and functional in the morning, low and moody at night: that flexibility is what makes a bathroom feel like a spa.
Where LED Strips Make the Biggest Difference
Modern LED strip lighting is slim, efficient and long-life, and the latest COB (chip-on-board) tapes give a continuous line of light with no visible dots. EMC stocks the Integral LED Premium Subtle Strip, sold in lengths from 1m up to an 8m reel, so you buy only what you need.
- Shower niches. A lit niche is the signature detail of a spa shower. Plan it before tiling: a tile-in profile such as the Vision TLD Multi Fix LED Diffuser (in 10mm and 12mm versions) sits flush with the tile edge and diffuses the strip, washing light down over a mosaic back panel.
- Floating vanities and cabinets. A strip under a wall-hung basin unit or mirror cabinet makes it appear to hover, and doubles as a gentle night light.
- Ceilings, steps and bath panels. Run a strip along a dropped ceiling recess or behind a bath panel to illuminate the wall and floor tiles from a low angle. EMC’s LED tile trims, including the Vision 11mm Step Edge Diffuser and Schluter LIPROTEC, can also break up large expanses of tiling or light a raised shower step.
Safety First: Zones, IP atings and Power Supplies
Bathrooms are humid environments, and UK wiring regulations (BS 7671) divide them into zones by how much water each area is likely to see. Every fitting needs an IP rating suited to the bathroom zone it sits in. The first digit of an IP rating covers protection against dust and solids; the second covers moisture.
| Zone | Where it is | Minimum rating |
|---|---|---|
| Zone 0 | Inside the bath or shower tray | IPX7, low-voltage (SELV) only |
| Zone 1 | Above the bath or shower, up to 2.25m | IPX4 (IPX5 if water jets are used) |
| Zone 2 | 0.6m beyond Zone 1, plus around the basin | IPX4 |
| Outside zones | Everywhere else | No formal rating, but IP44+ is sensible |
EMC’s Premium strip is rated IP65, which means it is dust-tight and protected against water jets, so it is suitable for bathroom lighting in wet areas such as a shower niche. Pair it with the right constant voltage driver: EMC stocks 20W, 75W and 100W IP67 power supplies. Keep drivers somewhere accessible and outside Zones 0 to 2 wherever possible, and always have the installation carried out or signed off by a registered electrician.

Choosing the Right Light: Colour, Dimming and Mood
The right light depends on the job. Colour temperature is measured in Kelvin: around 2700–3000K gives a warm, candle-like ambience, while 4000K is a neutral white light that shows true colours. EMC’s Premium strip is 4000K, which balances clarity with comfort and flatters marble and stone without turning creamy tiles grey.
If you prefer something cosier, combine a neutral strip at the mirror with warmer ceiling lights on a separate dimmer. Colour changing options (RGB or tunable white) can add fun, from a cool blue wash to a sunset glow, but use them sparingly. In a spa, subtle beats spectacular.
One Simple Test…
Take tile samples home and look at them under each light source, morning and evening. Many online shop filters let you compare finishes, but nothing beats seeing how a polished or matt surface reacts in your own room, with the steam of a hot shower in the air.
Planning Checklist
Good lighting has to be planned at the same time as the tiling, not added afterwards. Before work starts, make sure you have covered these details:
- Mark every lit feature (niches, vanity, ceiling recess) on your tile layout so profiles are installed during tiling.
- Measure each strip run and add up the wattage to size the driver, leaving some headroom.
- Check the IP rating of every fitting against its zone, and plan driver locations for safety and easy access.
- Put each lighting layer on its own control circuit or dimmer.
- Order tile samples and view them under your chosen lights.
Bring Your Spa Bathroom to Life
Calm, large-format tiles and carefully placed LED lighting are a simple formula, but the results are transformative. The tiles provide texture and protection; the light brings out every vein and edge.
For more ideas, browse EMC’s bathroom tiles and inspiration pages, or visit an EMC showroom in Nottingham, Derby or Leicester to see tiles and LED features side by side.